Monday, December 15, 2008

Did You Miss Me???

Okay I didn't forget about you. I have just been delayed with holiday sewing. I will be posting pictures form my Scrap Swap next week.

Today I am taking Judy's Stash Buster's Pledge. I Pledge to bust 104 yards of fabric from my stash in 2009. Now when you break it down I have to use 2 yards of fabric each week of the year from my stash. If I buy or am given fabric I have to bust that yardage too. Every Sunday in 2009 I will post what I took in and used for that week along with year to date purchased and used. I can only count the used if the project is 100% finished.

I know some of my readers don't have a blog if you would like to make the pledge yourself leave a comment here. Each week you can post a comment on how you are doing.

Some how I think busting 104 yards of fabric with Judy will be easier than loosing 30lbs with Weight Watchers.

Sunday, October 19, 2008

Scrap Swaps

I don't think I will ever use all of my scraps. So while linking around Blog Land I found SwapDex. SwapDex is a list of swaps happening around Blog Land. It gives you a little information about a swap and a link to go to the blog post about the swap. They have swaps for everything.

So on my first night of checking out SwapDex what did I find? a SCRAP SWAP!!! All things considering this is right up my alley. I am participating in {tidbits} Scrappy Fabric Swap. For this swap I am sending 3 people each 10 - 15 scraps from my stash. They will make something for me out of those scraps and send it back to me. In return each of those 3 people will send me 10 - 15 scraps from their stash and I will make something and send it back to them.

Today I am getting my scraps ready to mail tomorrow. I am excited to see what I get and what I can create with it. I should be receiving my scraps sometime before Halloween and I have to mail them back around Thanksgiving. I will post pictures as I go.

Saturday, October 4, 2008

When Life Gives You Scraps...

Make something! Another great way to use up some of your little scraps is to make art quilts, post cards, gift cards or ATC's. ( Artist Trading Cards)

There are books out on how to make fabric postcards. They can be mailed just like a regular postcard or in a clear envie. They do need to be hand cancelled though. It is pretty easy to make one. Here are a few basics. The size is usually around 4" x 5", measure a post card you already have or if using a clear envie make it to fit the envie. The back should be white, cream or muslin, easier to write on. The front mini art quilt whatever you like. A piece of thin batting in the middle and zigzag stitch the edges. Lightly quilt if desired.

To make a gift card is way easy. First you need a piece of card stock 8 1/2" x 5 1/2", fold card stock in half so the card is now 4 1/4" x 5 1/2". Make a small patch work to fit the card front. I have seen everything from small paper pieced works to a theme print boarded out. Them secure it to your card front, either sew it directly to the card with your machine or hand stitch it on.

An ATC is the size of a baseball card, a small art quilt, usually embellished, and has some batting in the middle. You can also frame them if you like. I have seen swaps where they have a theme, you create your ATC based on that, one for everyone in the group and the hostess trades them out. Some store them in baseball card binders or mini albums out for display.

Tuesday, September 16, 2008

When All Else Fails...

Give it away!

I am putting together the prizes from the contest I held at the end of August. So far each of the 4 participants will receive 1 half yard, 2 traditional quarter yards and 4 fat quarters. It may increase though, I am aiming for 3 yards total. Each pile is a hodge podge collection from my stash that I haven't used yet. I am planning on mailing 2 prizes this weekend and delivering the other 2 next week.

Another place to give away fabric is to your local philanthropy group, check with your local quilt guild or quilt shop. I am giving to Manteca Quilters, my guild. They make cute quilts out of 6" squares and then use the 3" x 6" rectangles to make variation of Chinese Coins. I have been cutting excess fabric into these two groupings to be delivered this week.

I am also revisiting my Mod Quad quilt this next week. Look for a new varation on that soon!

Tuesday, September 2, 2008

And The Winner IS...

All 4 who left a comment! I decided since I have A LOT of Stash and Scrap to Eliminate the everyone will be a winner.

So with that the winners will be receiving a prize from me in the next 2 weeks. I will be contacting each of you to find out colors you would like you prize in. After I know that all packages have been received I will post here what they won. Most likely around the beginning of October.

Thank you all for sharing your ideas on Scrap Elimination!

Side note, Scott's laptop would not let me log in yesterday to post this on the first.

Friday, August 29, 2008

Extra Quilt Batting

After you sandwich your quilt what the heck do you do with that Extra Quilt Batting (EQB) you trim off??? Don't toss it out!!! I have a few uses for it!

Okay the first one is a no brainer, I sandwich it between two pieces of muslin to practice my free motion quilting. I also have used a piece from the back of my quilt, sandwich my extra batting and do some test run quilt on it before I start my quilt. This way I make sure my tension is set correctly and that my thread is a good choice.

Next, some of my pieces are big enough to hang onto for a wall hanging or a small baby quilt. I have even piece 2 extra pieces together to do a baby quilt. I have also made Poop a little book from a panel, it called for a yard of batting. Not me I had EQB for the whole thing!

A fun one that I enjoy is the base for a quilted purse/bag. That fusible stuff is $6 to $8 a yard. Use your EQB, a little quilt basting spray and you are in business!

I made a bag last night that had batting in the straps. I pulled out the box of EQB, the piece in the perfect size just waiting for me on top of the stack.

Sunday, August 24, 2008

The Promises Surprise!

So I am having a little contest. It will start today. All you have to do is leave a comment on what you do with your scraps! Weather it is fabric, paper or any other hobby that has scraps.

I will leave this open for one week. Everyone that post a comment will be put into my drawing for a fun prize! I will hold the drawing on September 1st! So lets hear those ideas!

Scrap Gift Tags!

Okay now that you have used your old paper to make some fabulous boxes, what do you put in them? How about some cute little scrap gift cards.

I used Christmas paper to make my box and I had an extra piece of the paper to make my cards. My cards simply say To and From on the inside. Everyone need gift tags round the holidays. Great little gift to have on hand.

My card base is Card stock that I cut at 3" x 6". One Sheet of 12" x 12" card stock will make you 6 cards. I folded my card base in half, now 3" x 3". I used my circle scallop punch for the card stock backing on my image. Stamped my image on white card stock and punched with a circle punch. If you need them to tie to your package punch a small hole in the corner and thread through a piece of floss or ribbon.

Picture is coming.

Friday, August 15, 2008

Beautiful Budget Backs

I have been asked how do I come up with my backs. This tutorial is my method of creating Beautiful Budget Backs. I hate spending money on 3 to 9 yards of fabric that I am not creating with. So I usually do one of three things:

1. Yardage that was on sale that I like.
2. A large print that I like but wont use on the front, the pinup girls is a good example of this.
3. Pieced backs with leftovers.

I made this back with my leftovers from the front and 1 yard of Black Kona Cotton from my stash. The front measures 42" x 48". I would need to purchase about 3 yards of fabric to make the back. This back measures 48" x 54".

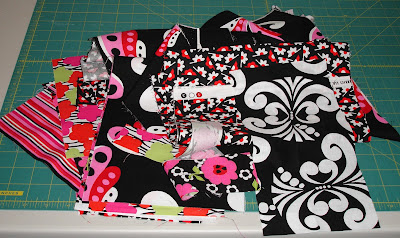
First thing I do is dig out the pile of scraps I have left from making the front. I also get into my stash to see what I have that might work with the scraps. In this case I choose to use Black Kona Cotton. I sort my pile into groups, triangles, squares, and then matching size chunks. This is what I started with, plus the yard of black.

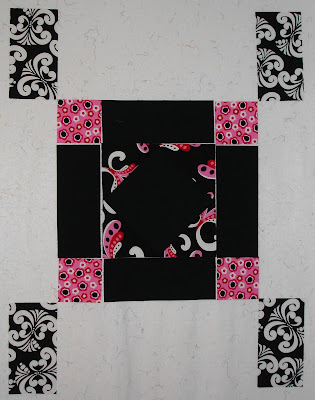
I decide to start with a center medallion for this one. When I choose to start with a center medallion I usually make it symmetrical. The reason I choose the square in a square block is because I had 4 equal sized triangles left over from bias piecing a set of border together.
This is where I made a mistake. I cut my Black and White print fabric BEFORE I finished my center block. They ended up to small to border the center block, so I moved them to try them out elsewhere. The black stripes size were decided by how big I could make my corner stones, the pink.
I needed filler for my Black and White corners. I was thinking of some sort of grid. Because of the size of the rectangles and the pink cornerstones I decided I wanted some stoppers too.
After I made the grid I wanted to try it out with the stoppers(top). I also wanted to make sure it was long enough for my center(bottom). If is wasn't long enough I would have added black on both ends to make longer.
For the sides it was a matter of which chunks were big enough to fill in the sides.
At this point I still need about 5 to 6 inches all around my quilt and most of my fabric is used up. I did still have one long stripe, 35", of the black, pink and white fabric and about 20" stripe of the stripe fabric. I decided with the amount of fabric that I had left that the long sides would be black and the short sides pieced. I tried my fabric out to see what I liked best. The top is with the stripes next to the print and I was going to put black on the ends. The bottom is using the stripe as cornerstones with black in between it and the print. I went with the cornerstones to continue the flow of the back.
This is my finished back. Once it is quilted I will trim it down. I try not to put too much into the last border since that is the one that will be cut off in the trimming.
This is all that is left of my pile of scraps and the yard of Black Kona Cotton.

As a side note I always keep 10 yards of Kona Cotton in White and Black in my stash. I also keep 3 yards of Kona Cotton in Snow in my stash. I do buy it at JoAnn's when it is on sale 50% off. There is a small color difference between the White and Snow. The Snow is more creamy that the bright White.

Friday, August 8, 2008

Paper Boxes


Just a few tips to improve on the video: Cut the bottom sheet of paper down to 11 1/2" x 11 1/2". That will fit the 12" x 12" paper for the top. Also I cut the flaps for both sides of the box before folding it together.

I love these little boxes! I am using up a "Stack" of paper that I bought a few years ago. The paper that I don't really like I am using the back, white side, for the bottoms! I love the idea of also stamping the back side of the paper if you aren't going to use the printed side. I am planning on making about 60 boxes for Christmas gifts. That is 120 sheets of paper!

Friday, August 1, 2008

Ugly Fat Quarters *EDIT*

My camera is missing so I can't give you a tutorial, so I am going to give you some ideas on what to do with Ugly Fat Quarters. You know the ones you get for free on a shop hop, the one in the pack of eight that you don't like, or that stack you won at Quilto!

1. Cut them into 2 1/2" stripes and use them in place of a Jelly Roll. They will look great in a scrappy quilt. There are some great quilt books out for Jelly Roll quilts or Can of Worm quilts.

2. Cut them into 6" squares and make a quilt for Philanthropy, 7 squares across and 9 squares down. You will feel good for making something for someone in need.

3. Cut them into smaller squares, I use 3" size, and make a scrappy 4 patch.

4. Throw them into a bag and sell them at the next Boutique for $0.50. One man's trash is another man's treasure.

5. Sew them together for a quilt back. Remember 4 Ugly Fat Quarter is 1 yard of fabric. People love seeing scrappy quilt backs. I have people commenting on mine all the time.

6. This tip came from Barbara, she heard it in a class on Saturday. Cut 2 1/2" Stripes, bias sew them together, and save them in a roll, similar to a Jelly Roll. When your roll is big enough you have Scrappy binding for your beautiful Scrappy Quilts! What a great Idea! Thanks for sharing Barbara!

Sunday, June 15, 2008

Travel Pillow Tutorial

I ended up with 4 extra 6 1/2 inch blocks after making a X block quilt for Sarah. So to eliminate Stash and Scraps I made her a matching pillow case for a travel pillow. My sewing instructions are an adaptaion of my friends Liz's Pillow Case Directions.

Supplies:

Extra Quilt blocks
2- 2 1/2 x 32 inch strips for framing block, you will need wider stripes if using 9 or 10 inch block
1- 2 x 32 inch accent strip
1- 9 x 32 inch cuff
2- 16 1/2 inch squares, 1 to line your block and 1 is the back of your case.
1 Travel Pillow, can be purchased at Walmart or Joann's
1. Sew blocks together to make 12 1/2 inch block, or start with a 12 1/2 inch block. If you have a smaller block 10 or 9 inch make a bigger frame in step 2.

2. Cut 2 2 1/2 inch wide stripes to frame out you block. If using a 10 inch cut them 3 1/2 inch wide and for a 9 inch cute them 4 1/2 wide. Frame out your block. Any method you choose. Finished size should be 16 1/2 inch, raw edge.
3. Cut 1 16 1/2 inch piece fabric to back your block. This is to cover up all of your seams. I lightly quilted my block. I ditched the frame and quilted a flower in the center pinwheel to match the quilt. This is the back of the lining.
4. Cut another 16 1/2 inch piece of fabric to be the back of your pillow. Now you are going to french seam the front to the back. With Wrong Sides Together you are going to sew 1/4 inch seam down one side. Press seam open. Fold Pillow Case Right Sides Together and sew the same seam at 3/8 inch. This enclosed your seam and you have no hanging threads.
5. Measure the top edge of your pillow case, it should be 31 3/4 inch. Now cut your accent piece 31 3/4 x 2 inches and cut your cuff 31 3/4 x 9. Press both pieces in half. Now open your cuff ONLY and place right side up. Matching raw edges pin accent piece to cuff.
6. With Right sides together pin top edge of pillow case to the raw edge of the accent and cuff. Roll the pillow case up onto the cuff.
Fold over remaining edge of cuff and pin. Your pillow case in now on the inside of the cuff tube. This is okay. Sew a 1/4 inch seam down the edge of your cuff. It is a good idea to back stitch at each end of the tube.
7. Flip the case out of the cuff tube. I use kitchen tongs for this. I place the tongs in the center of the tube and gather down the tube. I then clamp about 2 inches in the tongs and gently pull them out. It makes the flipping easy. Or use a kid with skinny arms to reach though and pull it out. Once flipped I pressed my pillow case.

One more french seam and we are done!

8. With Wrong Sides Together sew a 1/4 inch seam across the bottom and up the open side. I then trip all my long threads. Also you need to clip the two bottom corners.
Flip your pillow case Wrong Side Out and stitch your seam at 3/8 of an inch.
You are now finished!!! Go travel and test it out!

Tuesday, June 3, 2008

Memorial Day Project

I have decided I needed to try to make a few quilts just using what I have. That means no buying stuff for them, NOTHING not even thread. So this is my frist quilt to do that with. The pattern is called Mod Quad and can be picked up at Ladybug's Quilts in Manteca. There is over 100 different fabrics in it and no repeats. I did have to get 1 dark piece from my mom.


It did take me longer to cut out this quilt than it did to sew it up. It was a lot of fun. Finished size is 48 x 60, a nice throw. It is down at the quilt shop for display. I am going to quilt it when I get it home. I think it would be cute to do in Pink and black too. Hmmm. I am seeing another quilt coming.

Thursday, May 1, 2008

I didn't forget!

Hi all!

I have been busy sewing stuff for others and not really working on my scrap elimination, I have done some stuff though.

I have finished a four patch baby quilt made with my scraps, picture to be posted this weekend. The red and orange were from my stash but ALL the white and other colors were from my scraps. The outer border, black and white stripe, was a half yard left over from another project. The green flannel backing and binding was also left over form another project. This quilt is being mailed to a friend on the Paper Crafts Magazine message board. She found out the day I started the quilt that she was going to be a first time grandma.

I have also working on my Paper Scrap storage. I have decided to separate my scraps by color. Then I used 9x12 manila envelopes to keep the scraps in, I wished I used the next size up though. I also labeled each envelope with the color of paper inside. This has made it super easy to use up some of those scraps.

I have started a Cream of Wheat quilt with some of my fabric scraps. I have made 2 blocks I think I am going to need 300 to make a big enough quilt. I have also started my funeral quilt. I decided that I am going to make a Postage Stamp quilt for my casket. Let me say that I do not have anything wrong with me and have NOT been given 6 months to live. I have figured that to make a Postage Stamp quilt big enough I am going to need over 1000, inch and a half squares and I should start now. My idea with the Postage Stamp is I want it to represent my life's worth of work. I would like people to see it and say remember the quilt she make when I graduated, got married, had my babies, went into chemo, or won all that money with.

On the fifteenth, I promise, come back and I will have some cute cards out of scraps and an idea on what to do with you extra quilt blocks!

Tuesday, April 1, 2008

First Real Post

Thank you for coming to visit. I have started this blog to record my progress of Scrap & Stash Elimination. Now if you quilt you have some sort of "Scrap Basket" for all of those little pieces of fabric you cut off and just can't throw away. And if you paper craft you have a pile of paper scraps that are left over from a project you can't part with either.


So this blog dedicated to projects that are made from 75% or more of my scraps and 25% stuff from my stash. This is just excess stuff I have on hand. I have too much and need to start using it up! Now any of my projects I post here will be made with "stuff" I have on hand. I will not purchase any new product to make something here. I will not include my UFO's here, these are all new projects.


I will be updating this blog two times a month, the first and fifteenth of each month. It will have completed projects, ideas to help you eliminate your stuff, and much more. It will be Sewing and Paper Crafting stuff. I will keep track of gift of scraps, thread spools finished, four patches and other stuff that comes up as I go.


The first project idea I will share with you is my four patch project. I have been making four patches with my scraps to help use up leftover fabric, ends of bobbins, and almost finished spools of thread. I have been trying to use up my solid white scraps, it also helps keep some uniformity to your project. I choose 3" squares because that was the width of most of my white stripes. You can make your squares and size you choose. Just remember to make them all the same size.


First cut 2 squares 3x3 of each white and colored fabric.


Sew one white square to colored square. Repeat with second set. Press seam toward colored fabric.

Rotate one set of squares, match center seam and sew together. Press seam to one side.


Now make more!

Also if you would like to be a guest Blogger let me know. I would love to here others ideas on S.S.E.P.

Thursday, March 20, 2008

Welcome!

News of SSEP will be posted soon!